Skip to the content
Drive-Thru SOSGUIDE
All topics (5 of 13)
  1. 1What the board does
  2. 2Before you start
  3. 3Where to put the cameras
  4. 4Which lane type is mine?
  5. 5Set up the board
  6. 6Goals, the screen and alerts
  7. 7Using the board every day
  8. 8A TV with no PC: HDMI
  9. 9Reports
  10. 10Where alerts and reports go
  11. 11How the times are measured
  12. 12When something looks wrong
  13. 13Setup checklist

Drive-Thru SOS › Guide › Set up the board, step by step

5Set up the board, step by step

About fifteen minutes. You need an admin or manager sign-in and the cameras playing in Live View.

Make a new board

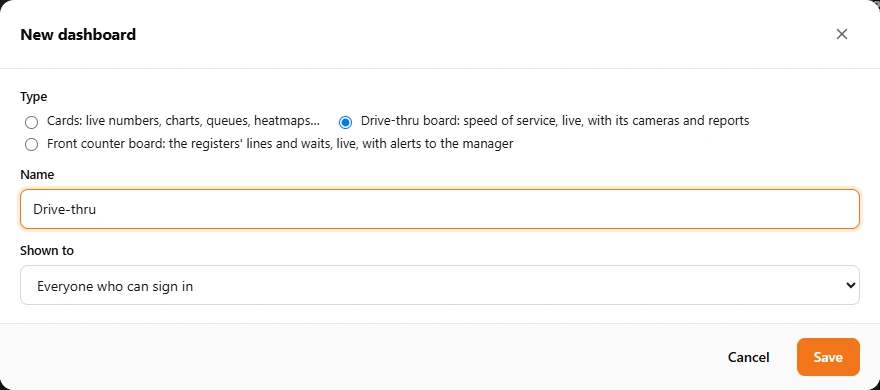
Open Insights and click the + beside the tabs. Choose Drive-thru board, give it a name (the store's or the lane's: Drive-thru) and pick who sees it under Shown to. Click Save. The board's settings open at once.
Drive-Thru SOS guide: Set up the board, step by step

Choose the lane type and a starting point

On the Lane tab, pick the Lane type from section 4, then click a Start from button. It lists the points in driving order, each with a usual goal. Every point still needs its zone, so each says Choose its zone…
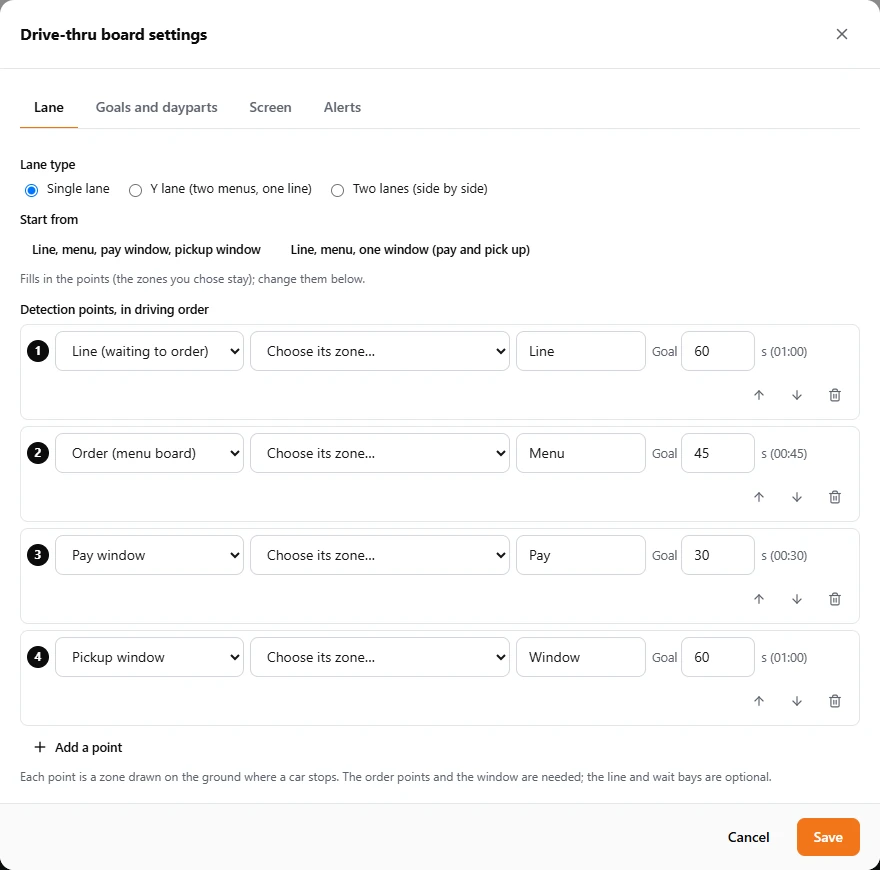
Drive-Thru SOS guide: Set up the board, step by step

Draw each point's zone

For the first point, open its zone list and choose + Draw a new zone…. In the window that opens:

  1. Pick the Camera that sees this point and type a Name (Line, Menu board...). Counts is already set to vehicles.
  2. Click each corner of the area on the ground where a car stops at this point, then click the first corner again to close it (or double-click, or press Enter). Esc starts again.
  3. Watch the dots. Each vehicle the AI sees has a box, and a dot where it stands: the bottom middle of the box. Green dots are counted in the zone; grey dots are not. Counted inside now says how many.
  4. Drag a corner to make the zone bigger or smaller. Click Save.

Do the same for each point. The next pages show each zone of the example drive-thru.

Draw the zone where the car stands

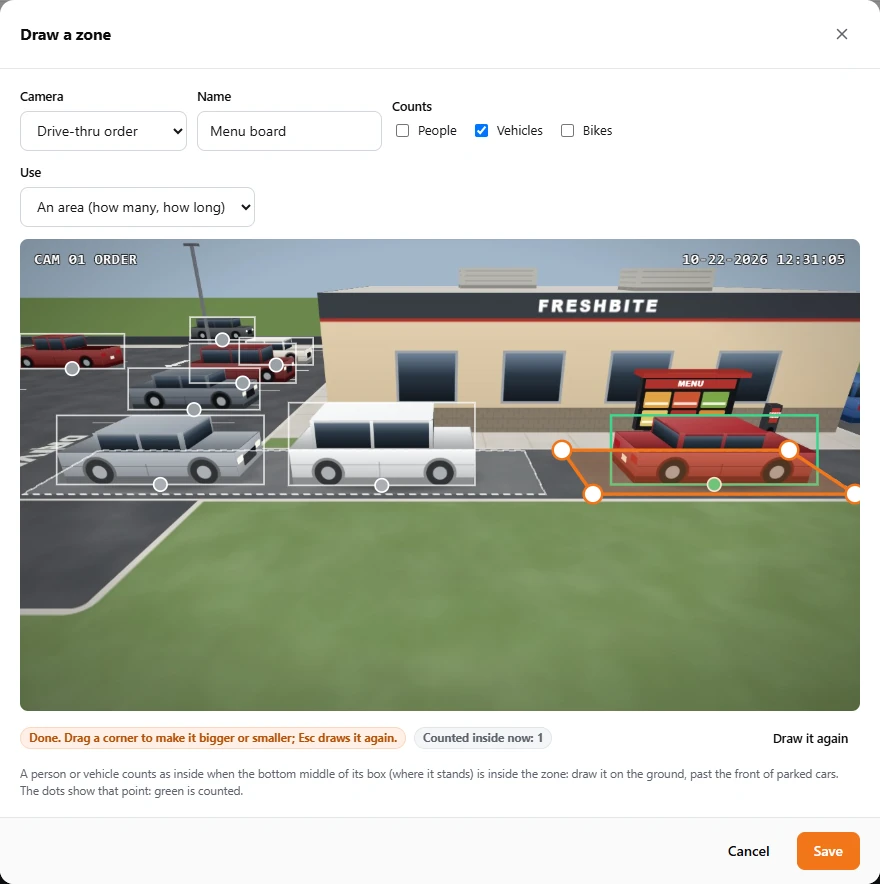
The AI judges each car by the point where it touches the ground (the bottom middle of its box), not by its roof or its middle. Draw the zone on the lane where cars stop, wide enough to hold the whole stopping place, and reaching past the car's front and back.
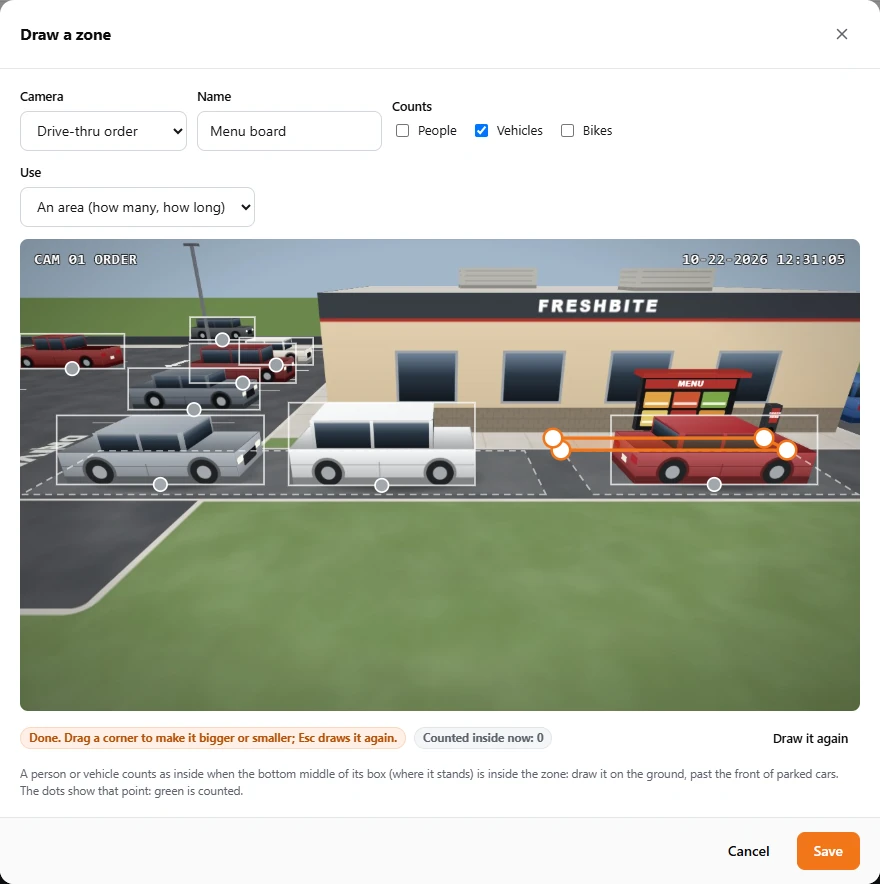
✗ Wrong: a thin zone drawn on the curb behind the car. The car's dot (grey) is outside it: Counted inside now: 0 . The car at the menu board would never be timed.
✗ Wrong: a thin zone drawn on the curb behind the car. The car's dot (grey) is outside it: Counted inside now: 0. The car at the menu board would never be timed.
✓ Right: the zone covers the lane where cars stop at the menu board. The car's dot is green: Counted inside now: 1 .
✓ Right: the zone covers the lane where cars stop at the menu board. The car's dot is green: Counted inside now: 1.
One car per pointA point's zone should hold the car being served there, not the cars queued behind it. If Counted inside now shows two cars at the menu board, the zone reaches back into the line: make it shorter. (The Line point is different: it is meant to hold the cars waiting.)
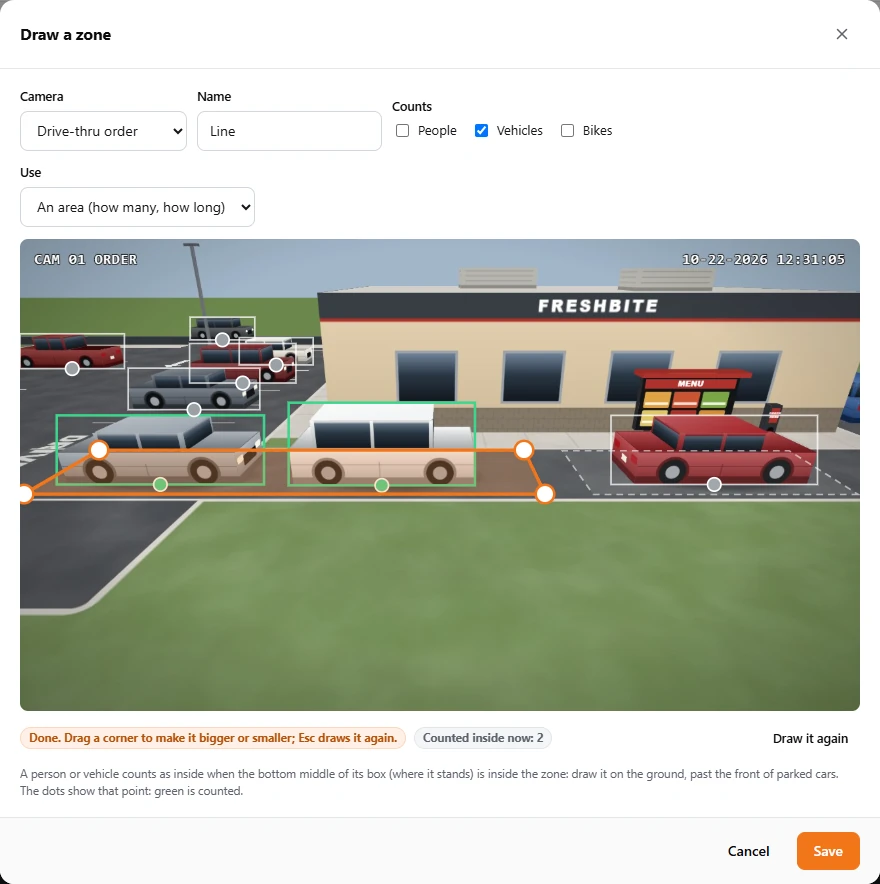
1 Line , camera A: the cars waiting before the menu board, here two ( Counted inside now: 2 ). Cover the stretch of lane where the queue forms.
1Line, camera A: the cars waiting before the menu board, here two (Counted inside now: 2). Cover the stretch of lane where the queue forms.
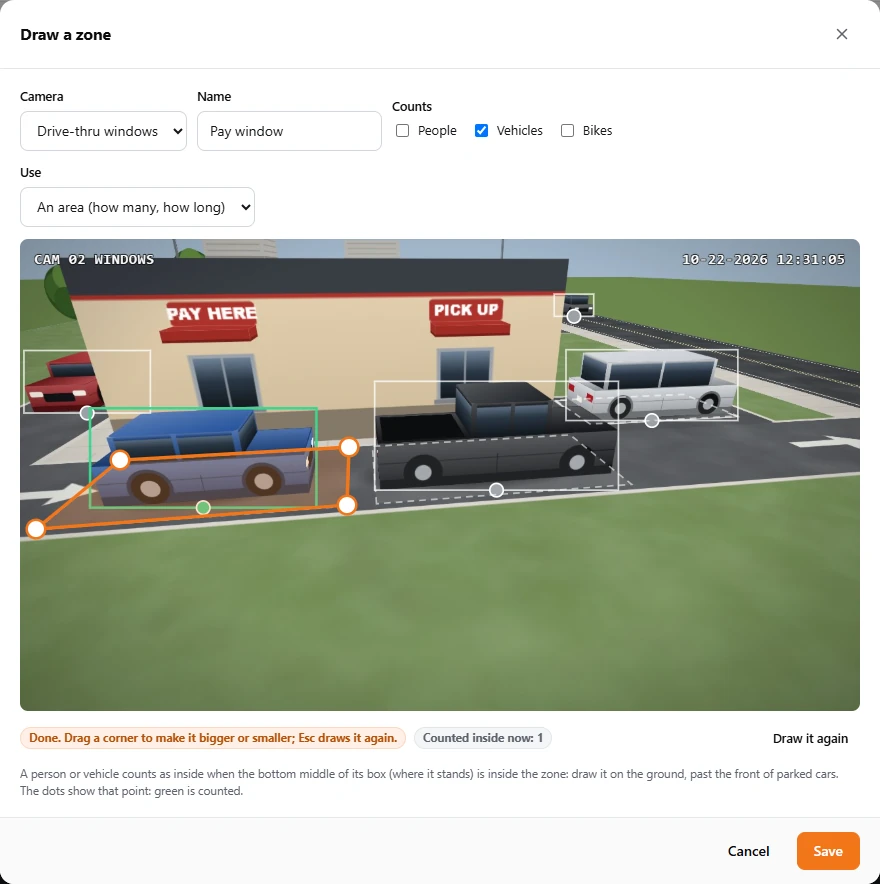
3 Pay window , camera B: the place where the car stands at the pay window.
3Pay window, camera B: the place where the car stands at the pay window.
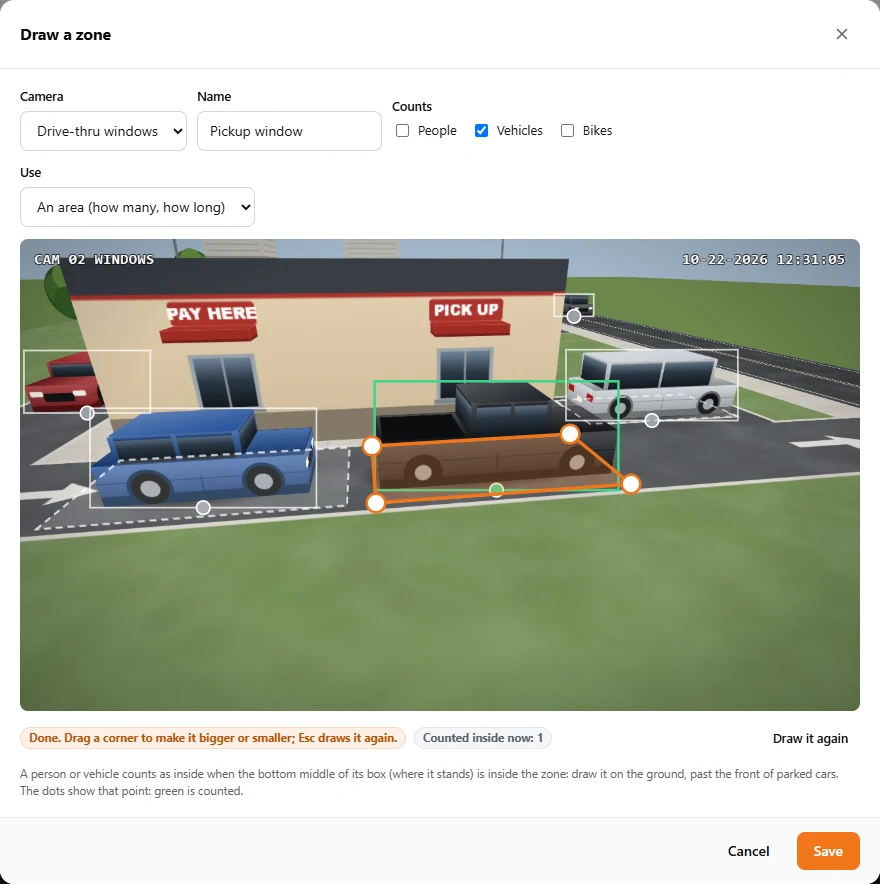
4 Pickup window , camera B. The pay zone (left) and the pickup zone must not overlap: a car is at one or the other.
4Pickup window, camera B. The pay zone (left) and the pickup zone must not overlap: a car is at one or the other.

Name the points and set their goals

Back on the Lane tab, every point now has its zone and the camera that sees it. The name you type is the one on the board's signs (Menu, Pay, Window). The goal is how long a car should take at that point, in seconds. The arrows change the order; the pencil redraws a zone; the bin removes a point.
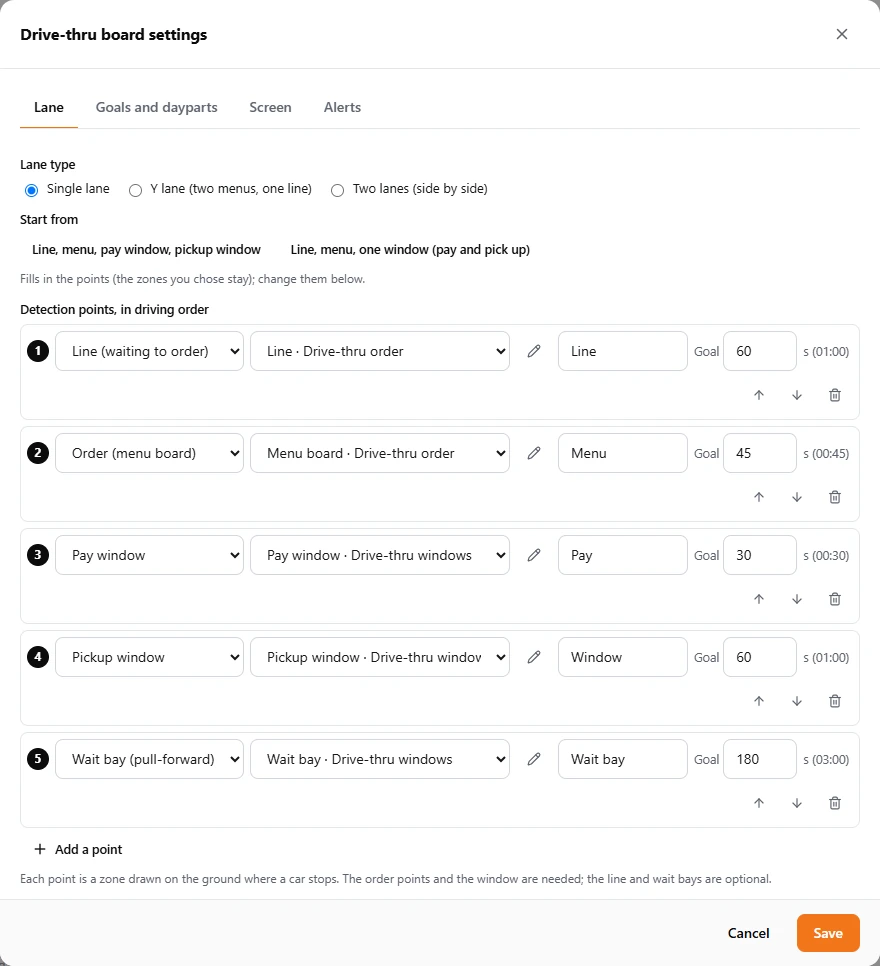
Drive-Thru SOS guide: Set up the board, step by step
PointWhat it timesUsual goal
1Line (waiting to order)Waiting in the queue before the menu board60 s
2Order (menu board)Ordering at the speaker45 s
3Pay windowPaying30 s
4Pickup windowWaiting for the food at the window (90 s when it is also the pay window)60 s
5Wait bay (pull-forward)A car sent to wait in a bay for its order2 to 3 min

Save, then check each zone on the live picture

Click Save. The board appears at once. Watch a few cars go through. Back in Edit › Board settings, the pencil beside a zone opens it on its camera's live picture: the cars there now show their dots, green when counted. Drag its corners to move it; it keeps everything measured so far.
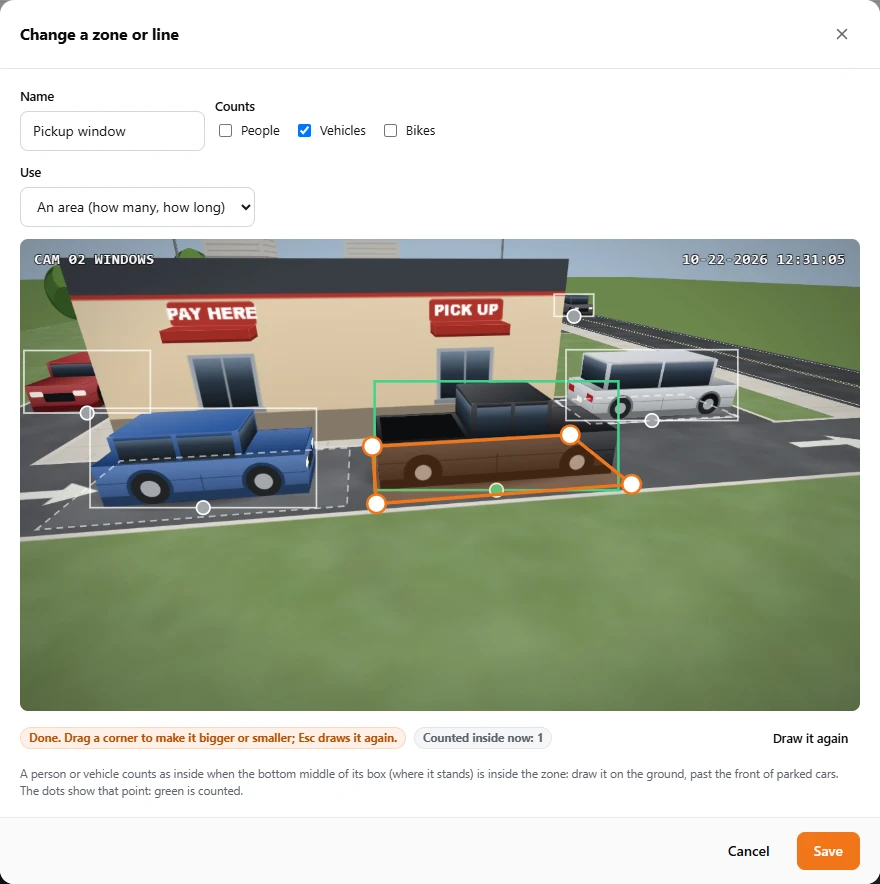
Checking the pickup window's zone: the truck at the window is counted (green dot). The car in the wait bay and the car at the pay window are not, as it should be.
A quick test with a stopwatchOn the first day, time three or four cars yourself from joining the line to leaving the window, and compare with the board's car log (section 9). If a car's time is off, its zones need moving (section 12).

Stuck on a step?

iLink Professionals supports owners and installers. Call, or send us a message.